Weather Instruments
The Weather Instruments MatchCard gives students practice using and comparing instruments to measure weather conditions.
Free Download Below
Using the Weather Instruments MatchCard
This is MatchCard #5 of the Weather Unit Study. Directions for using MatchCards are below.Using Weather Instruments
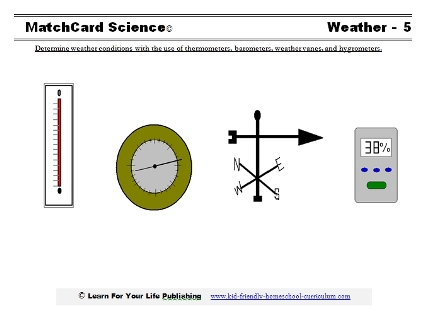
Objective: Determine conditions with the use of thermometers, barometers, weather vanes, and hygrometers.This MatchCard will focus on the use of the four most common weather instruments, and have students practice using them and recording data.
Thermometers
Thermometers are one of the most familiar scientific instruments. Here are some activities for using thermometers to study weather:- Take the temperature three times a day at about the same time. It may be helpful to schedule this right before or after meals. Temperatures will change throughout the day in relation to the sun, and in relation to the overall weather for the day.
- Compare temperatures inside and outside. This is particularly helpful in months when you don't have heaters or air-conditioning on.
- Compare the temperature in the shade and in the sun.
- You may want to compare Celsius and Fahreneheit temperatures with the Celsius to Fahrenheit MatchCard.
Barometers
Barometers measure air pressure. Air pressure can help predict short term changes that may occur in the weather. The air pressure generally goes up on a sunny day and down on a rainy day (somewhat like moods.)Many homes have barometers, and local stores sell them. However, if you like to make your own weather instruments, here is a simply barometer you can make.
Make your own weather instruments - Barometer
- Get a small, empty glass jar. You do not need a lid.
- Cut a balloon in half with scissors. You will throw away the bottom half with the neck.
- Stretch the top half of the balloon over the mouth of the jar. Use tape or a strong rubber band to hold it in place.
- Tape a
strawto the top of the rubber band across the jar. One third of the straw should be over the edge of the jar. You may cut the straw if it is too large. - Put the jar on a counter top, against the wall, where it will be out of the way. Tape an index card or small sheet of white paper to the wall behind the card.
- Position the jar so the straw is along the index card. As the barometric pressure goes up, the straw will be raised.
- Use a millimeter ruler to measure changes in atmospheric pressure.
Wind Direction Vane
Wind-direction vanes, usually known as weather vanes, are one of the most popular weather instruments. They are often found perched on top of a barn, with the familiar rooster shape on top.What does a wind direction vane do? In addition to telling the direction the wind is coming from, the rate of rotation is also a visual indicator of wind speed. Farmers used to use the information of the wind direction to help determine the coming weather forecost.
Here are some projects for using a weather vane.
- Record the wind direction every day. Take note of the weather at the same time, and the day following your recording.
- Go on a weather vane hunt in your local area. There may be more in your neighborhood than you noticed before.
- Look in a catalog, store, or the internet for different weather vane designs. Is the rooster your favorite?
- Make your own weather vane with the directions below.
Make your own weather instruments - wind direction vane
Here's how to make your weather vane:- Using thin cardboard (like the lid of a shoebox), cut out a triangle and a rectange. These will be the point and the end of your arrow.
- Tape the triange one end of a drinking straw. Tape the rectange to the other end. This should form an arrow.
- Get a sharpened pencil with a new eraser.
- Using a sewing pin, push the pin through both sides of the straw. Then push the pin into the eraser.
- Push the pointed end of the pencil into the ground. The arrow should point in the direction the wind is blowing towards.
Hygrometers
Hygrometers measure relative humidity, or the amount of water vapor in the air. It is stated as a percent. 50% humidity means that the air is holding half the amount of water vapor that it could at that temperature.Make your own weather instruments - Hair Hygrometer
- Get a long human hair (about eight to ten inches.)
- You will need two washers. Tie each end of the hair to a washer, so the hair is between.
- After someone has taken a hot, steamy shower; take your hygrometer into the bathroom. Let the hair absorb some of the moisture for a few minutes.
- Pull the two washers apart so the hair is taut, but don't pull too hard of you will break your instrument.
- Using a millimeter ruler, measure the length of the hair. This is 100% humidity.
- Now, go into a drier room. Blow dry the hygrometer using a blow dryer for one minute.
- Now measure the length of the dry hair. This is 0% humidity.
First, write down the difference in length in millimeters that the hair changed from dry to moist conditions.
Now take the hygrometer into another room in your house - not the bathroom or kitchen. Measure the length.
Write the current measurement as a percentage of your first measurement. Repeat that on different days. The accuracy of your hygrometer will change with the temperature. Why? Air can hold different amount of water vapor at different temperatures, so the percentage changes. However, you can repeat the steps you used when you first made your hygrometer (measure in a moist bathroom and after being blown dry) to re-callibrate it.
Pine Cone Hygrometer
This is even easier to do, though it will not reflect changes in your day to day humidity.- When your dishwasher is on the dry cycle, stick a pinecone into it. (Don't run the dishwasher with the pine cone in it, or it will get soaking wet. You want the pine cone to absorb some of the moisture that is in the dish washer when it is filled with moisture.)
- You can also do this by putting an open mug of water in the microwave and heating it to boiling point. Then put the pine cone in the microwave, and shut the door again for a few minutes.
- After the pine cone has had a few minutes to absorb the moisture, take it out. Take a photo or draw a picture of the scales on the pinecone.
- Blow dry the pine cone for three to five minutes with a hair dryer. Take another photo or draw the pine cone. Compare it to the scales before.
Could you use a pine cone in your house to help determine if the humidity was dry or wet? (Yes) Could you use it to measure the humidity? (No, there is not a scale for measurement.)
Let's Use the Weather Instruments
Using your weather instruments, you want to make a comparative chart of the weather conditions over a period of time.- You may want to use your instruments every day for several weeks.
- Or you might want to measure weather conditions once a week for several months.
- Don't forget to make a chart of your data.
- As you become familiar with weather conditions, try to predict the temperature, barometric pressure, wind direction, and relative humidity before taking your measurements.
- Don't forget to compare with the local weather forecast later in the day. Keep in mind reasons for the differences.
Science Experiment
Does one type of home heating system change the humidity in the house more than another type?To do this experiment you will have to be in an area that gets cold and requires home heating systems (fire place, electric heat, oil, gas heat, etc.) to heat the home.
Choose two or more different heating systems to compare. Ideally, you should have four or more homes using the same heating system to make your measurements. (If you choose three different heating systems to compare, you will need at least eight homes.)
Choose the hygrometer you wish to use. You may make your own human hair hygrometer (instructions above) or buy a hygrometer. A purchased hygrometer will cost more money, but will also last longer and be less likely to break.
Develop your hypothesis and design your experiment. What will you use as the control?
Word Study: Meter
Meter is a suffix on many of the weather instruments. It means “measure” in Greek.Group Contest
Here’s a quick contest: who can write down the most words with “meter” in five minutes.MatchCard Science
How To Use MatchCards

Download the FREE MatchCard Science Instructor's Guide and see how MatchCards can make building their science knowledge base fun.
Weather Unit Study
Nine different weather lessons can be presented in this 4 week study.
Download the entire Weather Unit Study.
12 Science Unit Studies

Chemistry is only one of twelve complete unit studies for kids in 3rd to 8th grade.
Comprehensive objectives, hands-on projects, suggested science fair experiments, and the fun game-like MatchCards keep them interested in learning science. See all twelve MatchCard Science Unit Studies.
About Our Site
Hands-On Learning


