Tooth Model
Take a Bite Out of Tooth Decay with our Teeth Lesson Plans
The tooth model is the third MatchCard in the MatchCard Science Human Anatomy Unit Study for grades 3 - 8. Learn the parts of teeth and their function with the teeth lessons in this unit.
Free Download Below
MatchCard Science Teeth Lesson Plans
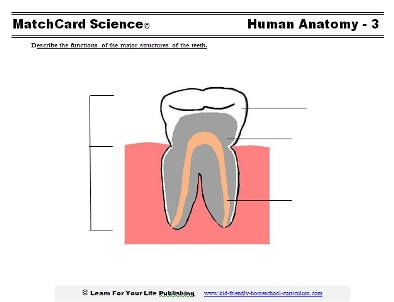
Objective: Describe the functions of the major structures of the teeth.MatchCard Information Pieces identify the parts of the tooth and their function on the tooth diagram. Ideas for projects are listed on the instructor's page and below.
Use the Tooth MatchCard
The tooth model MatchCard is an important part of your teeth lesson plans. The first page has a color tooth diagram. The second page has the same diagram of a tooth model in black and white. This can save your color cartridge. Students may color the tooth diagram themselves.The student matches the definitions and descriptions with the diagrams of the tooth model.
The third page is the Instructor's Guide with the correct answers.
The fourth page has the Information Pieces. Student's cut them apart and place them in the correct place on their copy of the Matchcard tooth diagram (First page if you are using color, second page if you are using black and white diagram.)
Getting Started
Start by having some foods like apples, carrot sticks, or corn-on-the-cob to eat. Ask the students to pay attention to what their teeth are doing when they eat the food.Let's think about those teeth:
- Why don't they fall out when you bite into a carrot? (They are attached at the bone beneath the gums.)
- Why are the front teeth shaped the way they are? (They slice the apple or other food like a knife.)
- Why are the back teeth shaped differently? (They grind the food into pieces.)
- What would happen if your front teeth were in the back and the back teeth were in the front? (Imagine trying to eat corn-on-the-cob that way!)
The Tooth Model
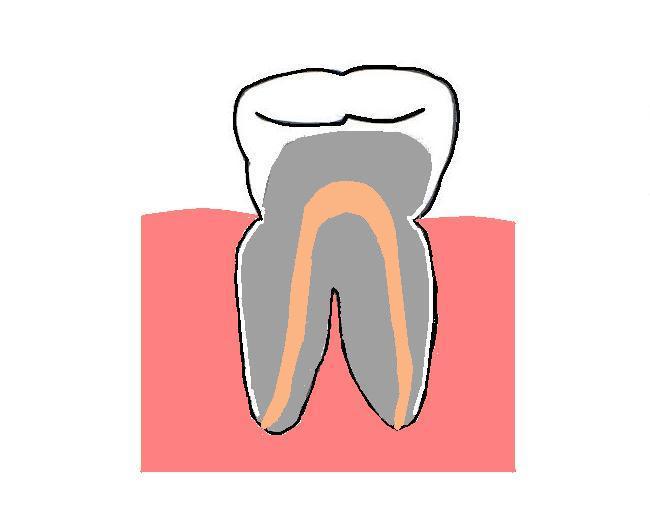
- The gums are the soft tissues surrounding your teeth.
- The crown is the part of the tooth above the gums. You can see it.
- The root is the part of the tooth below the gums which is not visible.
Parts of the Tooth
Enamel
The enamel is the part of the tooth that you can see on the outside. Enamel is white. It will yellow with age.Enamel can be compared to the colored part of M&M candy pieces. It is only a thin layer.
Dentine
Dentine is the hard substance inside the tooth that supports it. You can call dentine the "skeleton of the tooth."Without the dentine the tooth would not be strong enough to bite into food and would crack and fall away very easily.
Pulp Cavity
Cavity means "hole" or "space." (Think of a cave.)The pulp cavity is like a tunnel inside of the tooth. It has blood vessels and nerves.
Just like all other tissues of the body, the cells in teeth and bones need the oxygen and nutrients delivered by the blood system. If you have ever looked at the bottom of your tooth after it has fallen out, you may see the pulp cavity with a tiny bit of blood still in it. The blood vessels are essential to the tooth.
In addition, the pulp cavity contains the nerves. Nerves allow the brain to recognize pain and pressure. If you have a toothache, you might wish there were no nerves in your tooth. However, that is a sign the tooth is in trouble - and the sooner a dentist fixes the tooth the less damage there will be.
Build a Tooth Model
You can build a tooth model two different ways:
- 1. Purchase a kit - These are available on-line and at local stores in the $10 to $25 range.
- 2. Make it from clay - Cheaper, easier, and not quite so realistic. Three colors are needed (four if you include the gums.)
If you build your own model, start by making the pulp cavity by rolling the clay like a snake. Build the dentine around that. Then use white clay to shape the tooth.
Learning About Cavities and Dental Health
Part of your teeth lesson plans include dental health and preventing cavities. Here's a simple project for elementary children.Your Smiley Face
Use a white paper plate. Have them draw a face, including a big smile with white teeth.Use a pencil to draw the outline of the teeth. Then color the teeth white with a white crayon. The white is the enamel on your tooth.
Just in case you have a child who really likes his/her own art work and doesn't want it messed up, you can do a sample one yourself. That way you won't be spoiling their artwork with the tooth decay that is coming next.
Take a thin black marker and put a little cavity on one of the white teeth. Add a drop of water. (You can use an eye dropper, or just let one drop drip off a finger tip.) Then, go proceed with the next activity below. After a few minutes, come back and see what has happened to the nice white smile.
Plaque
How about a snack? Perhaps a nice chocolate cream filled cookie (the type that stay stuck to your teeth) or some popcorn. The idea is to provide a snack that sticks around for a while.Discuss some of the obvious foods that stay stuck to your teeth. But others may not be so obvious. The back molars are a great place for food to stay for a little while. But the area at the base of the teeth is a favorite place younger students are not as aware of.
The sugar from foods combines with saliva and creates an acid. We can do an experiment later to see what the acid does.
Meanwhile, now might be a good time to check out the smile on your paper plate.
Small Cavities
When plaque is left on teeth, it creates a hole called a cavity. A small cavity occurs when the enamel is eroded by the plaque.Instead of nice white teeth, you are left with brown and grey spots. Fortunately, dentists can fill a cavity and cover it with a white coating.
Large Cavities
What happens when a person doesn't go to the dentist, and a small cavity is not filled? It gets bigger.When the cavity eats through the enamel, it will reach the area of the dentine. As it erodes the dentine, a large cavity occurs.
Now, the integrity of the tooth is affected. The tooth may continue to rot or even break. Hope this person will be seeing the dentist soon.
Tooth Abscess
Yikes! The person above missed his dental appointment, and now the decay has spread to the pulp cavity.An abscess will form. The tooth is now rotting.
What was in the pulp cavity? Nerves and blood vessels. A terrible tooth ache may occur.
More Projects for Your Teeth Lesson Plans
Tooth Decay In A Cup
Here is an illustration of the effect of acid on teeth. Save some chicken bones. Boil them to get all the meat off.
Then place the bone in a transparent glass. Pour one cup of white vinegar over it.
Keep a chart of how long it takes to affect the chicken bones.
Then go brush your teeth.
Chewing Choppers
Dentists keep records of the individual teeth each person has. Have the student count how many teeth she or he has.
Make a diagram. Pay attention to which teeth have the flat surface of the molar or the sharp edge of the incisors.
You can also make a tooth model for all of your teeth. Clay or small marshmallows can be used.
The Toothbrush Challenge
Use dental tablets to give them a pop quiz on brushing.
You can buy the tablets on-line or at some local pharmacies. Have the students chew the tablets completely and look at their teeth in a mirror.
Now, without looking in a mirror, they need to brush their teeth.
Look again. Pink spots are the areas missed.

Interested in ANIMAL teeth?
Check out types of animal teeth to learn about the different types of teeth for plant and meat eaters.
Make a diagram. Pay attention to which teeth have the flat surface of the molar or the sharp edge of the incisors.
You can also make a tooth model for all of your teeth. Clay or small marshmallows can be used.
The Toothbrush Challenge
Use dental tablets to give them a pop quiz on brushing.
You can buy the tablets on-line or at some local pharmacies. Have the students chew the tablets completely and look at their teeth in a mirror.
Now, without looking in a mirror, they need to brush their teeth.
Look again. Pink spots are the areas missed.

Interested in ANIMAL teeth?
Check out types of animal teeth to learn about the different types of teeth for plant and meat eaters.
MatchCard Science
How To Use MatchCards
Download the FREE MatchCard Science Instructor's Guide and see how MatchCards can make building their science knowledge base fun.
Human Anatomy Unit Study
Download the entire Human Anatomy Unit Study
12 Science Unit Studies

Chemistry is only one of twelve complete unit studies for kids in 3rd to 8th grade.
Comprehensive objectives, hands-on projects, suggested science fair experiments, and the fun game-like MatchCards keep them interested in learning science. See all twelve MatchCard Science Unit Studies.
About Our Site
Hands-On Learning


