Sound Waves Worksheet
Pitch, Frequency, Amplitude, Intensity
The sound wave worksheet from MatchCard Science explores pitch, intensity, amplitude and frequency as students experiment with waves.
Free Download Below

MatchCard Science Sound Waves
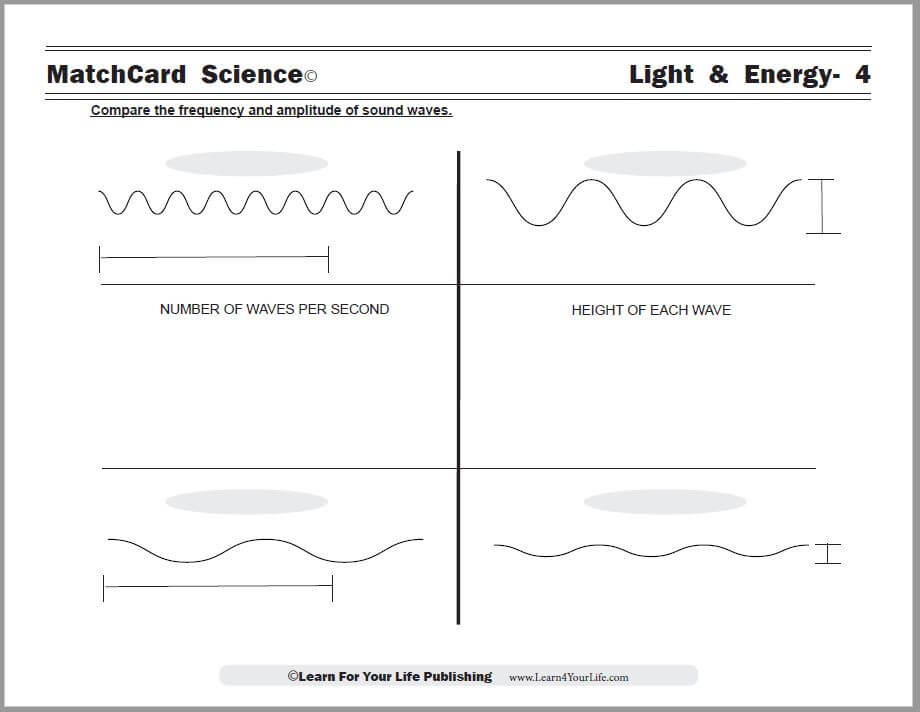
Objective: Compare the frequency and amplitude of sound waves.MatchCard: Download below.
MatchCard Information Pieces are placed to identify the frequency and amplitude of waves. Ideas for projects are listed on the instructor's page and below.
Sound waves behave like many other types of waves. Exploring how sound waves function helps student understand hearing and music. Understanding sound waves also helps them to grasp the more abstract concept of light waves and other electromagnetic waves.
Print the Sound Waves MatchCard


This is MatchCard #4 of the Light and Energy Unit Study. Find more information on MatchCard Science below.
Learning About Waves
Anatomy of a Sound Wave
Compare a sound wave to the waves on a beach. Each wave goes from crest to crest (from one high point to the next high point.)Experiment with Pitch
Pitch refers to how high or low a sound is. Use the following objects to demonstrate pitch:- Make a high and low pitched sound with your voice. With your hand over your vocal cords, note the difference in the vibrations.
- Using a musical instrument, make a high and low pitched note. Stringed instruments are particuarly good for this.
- Take a rubber band, or metal wire, and stretch it. The tighter you stretch it, the higher the pitch.
- Using two or more glass drinking cups that are the same, fill each with a different amount of water. Put them in order of highest to lowest pitch.
Learn more about Pitch
Pitch is the frequency of sound waves per second. The faster the sound waves move, the higher the pitch.After explaining this concept, experiment again with the objects above and other sound producing objects. We measure frequency in hertz.
Memory aid: The high pitch notes of that opera singer "hertz" my ears.
Compare the illustrations from the Sound Waves MatchCard for high and low pitch sounds.
Experiment with Intensity
Using the same objects you used to explore pitch, now explore the characteristics of intensity.If you bang the glass harder, you get a louder sound. If you clap your hands louder, you get a louder sound. You can make a high pitched sound that is loud or soft. You can make a low pitched sound that is loud or soft.
Learn More About Intensity
Intensity is the amplitude of sound. Amplitude is another way of saying the crest of the wave is tall or short.We measure frequency in decibels.
Compare the illustrations from the Sound Waves MatchCard for high and low intensity sounds.
Name that Wave
With the students' back turned, or positioned in an adjoining room, make different sounds using a variety of objects. The student identifies the sound as high or low pitch, and high or low intensity.Tuning Fork
This experiment works best with a tuning fork. But if one is not available, a metal kitchen fork may accomplish the same goal.The tuning fork can demonstrate that sound travels through different media. Usually we hear it travel through air. Demonstrate this by striking the fork, and placing it close to the opening of the ear to hear the sound of the fork's vibrations.
If you strike the fork again, and put it against your forehead, you will hear the sound waves as they are transmitted through bone.
Sound Waves through Solid Objects
Native Americans put their ear on the ground to hear if enemies were approaching. You can use this same principle.Have the student put his or her ear on a desk or table top. Very, very lightly, tap the surface of the table. When they pick their head up, tap it with the same force and let them compare the difference. Students can compare the ability of different objects to transmit sound: walls, mirrors, windows, carpet, concrete.
Wave Patterns
This may help students visualize sound waves slightly differently. Using a thick rubber band, stretch clear kitchen wrap across a coffee can or metal mixing bowl. Evenly sprinkle sugar granules across the top.Hold a pencil with its eraser down vertically over the can. Let it drop a few inches so the eraser bounces gently on the wrap. Notice the pattern the granules make.
MatchCard Science
How To Use MatchCards

Download the FREE MatchCard Science Instructor's Guide and see how MatchCards can make building their science knowledge base fun.
Light and Energy Unit Study
Download the entire Light and Energy unit study.
12 Science Unit Studies

Chemistry is only one of twelve complete unit studies for kids in 3rd to 8th grade.
Comprehensive objectives, hands-on projects, suggested science fair experiments, and the fun game-like MatchCards keep them interested in learning science. See all twelve MatchCard Science Unit Studies.
About Our Site
Hands-On Learning
