Layers of the Earth
Use this MatchCard to teach the Layers of the Earth.
Information, Activities, and Hands-on Learning Fun.
Free Download Below
Learn About the Earth's Layers
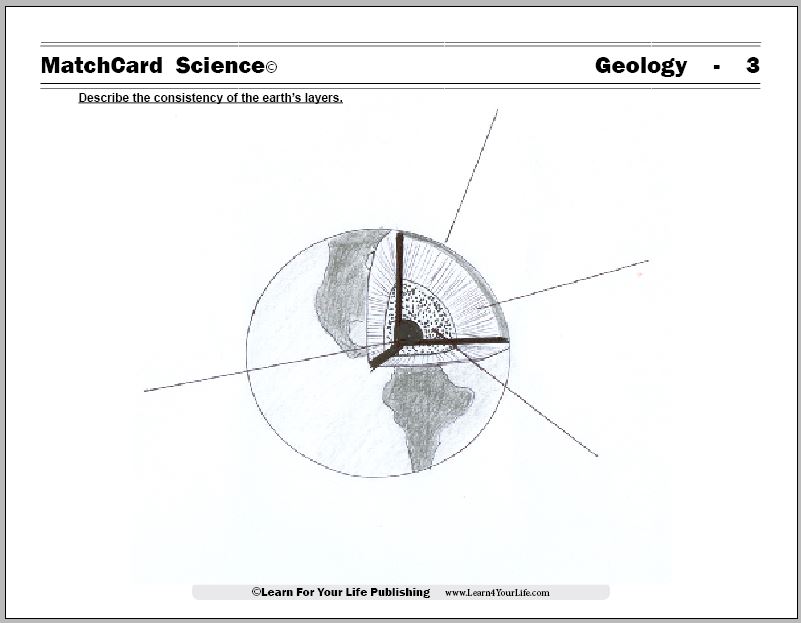
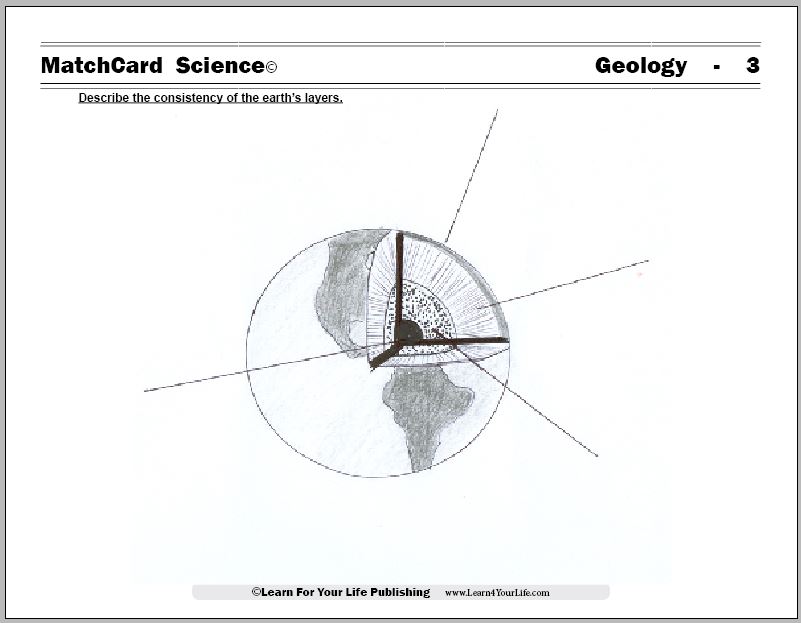
Objective: Identify the layers of the earth and describe their consistency.Students use the Information Pieces (3rd page of download) to identify each of the layers on the diagram and the description of each.
Download and Use the Layers of the Earth MatchCard
This is MatchCard #2 of the Geology Unit Study. Look below for more information on MatchCards and the MatchCard Science curriculum.Introducing the Concept
Use a globe or model of the earth. Point out where you are on the globe. Ask what would happen if they were to dig down through the center of the earth. Let the student(s) explain what they would discover if they could keep digging.Let’s Imagine
If you could dig all the way through to the other side of the globe, where would you end up (answer depends on your location.)The diameter of the earth is approximately 8,000 miles or 12,000 km. That is how far you would have to travel THROUGH the earth. But the circumference is 25,000 miles (40,000 km) so you would have to travel 12,500 miles (or 20,000 km) to get to the same location ACROSS the earth. Sounds like a short cut to go through it, doesn’t it?
Ask what would happen if you tried?
Let’s Get Real
It would not be possible to go through the center of the earth. Even if you had the equipment to do so (and nobody does) you would not survive the journey. The earth is made of different layers, and the center is not habitable.The Earth's Layers
Inner Core
If we could start at the very center of the earth, we would be at the inner core.The inner core is solid, due to the intense inward pressure.
It is 1000 kilometers in radius (2000 in diameter.)
Outer Core
Moving out from the inner core, we come to the outer core.The outer core is a hot, burning liquid.
It is 2000 kilometers from edge to edge.
Mantle
The mantle is the next outermost layer. It is the largest layer, 3000 kilometers in depth.The mantle is a thick, syrupy liquid. Students are often familiar with it when they think of lava from an earthquake.
Crust
The crust is the outer layer. It is merely a thin layer of approximately 50 kilometers covering the mantle. Of course, the thickness of the crusts differs from one place on the earth to another.2 Dimensional Models of the Earth's Layers
Plan to make at least one of the two dimensional models listed below. To introduce the concept, we will make a 2 D model of a piece of fruit. Then make a 2 D model of the layers of the earth.There are several different ways to make this model and several suggestions are listed. You may like to present the information above about one layer, add that layer to your model; then proceed to the information and diagram of the next layer.
Cross Section of Fruit
For younger students, a piece of fruit can be used to demonstrate how a 2D cross section represents a 3D object. Foods that work well for this include: You only need one of these:- Avocado
- Peach
- Apple
- Watermelon
Use Our Templates
You may make your own 2 D model as instructed below. To make it shorter, you can also download the Layers of the Earth Template. It is a two page handout with a full circle model and a half circle model. See instructions below for more ideas on how to use the templates.Use a Geometry Compass to Make Concentric Circles
Use a compass and pencil to make your own model of the earth. If you use the scale of 1cm for every 1000 km (see chart below) you can make the same size and shape diagram as you used for the target.Alternative: Trace & color the target from the link above.

Half Circle Models
If you use the 800 km per 1 cm scale (above), you can make a larger model that allows half the Earth to fit on a 8.5 x 11 in sheet of paper. See the link above if you want the template pre-measured for that size.
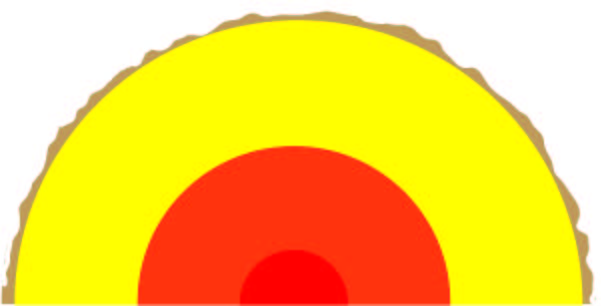
Alternatives: You may use the scale and make a complete circle if you use larger paper or poster board. You may also use two pages and make two half circles and combine them into one whole. Or you may simply use a half circle to represent the layers of the earth.
Construction Paper Model
Use brown construction paper for the crust(or a brown paper bag), yellow for the mantle, orange for the outer core, and red for the inner core. Use the scale for 800 km for one cm (see the chart above.)Label the four parts.
The Glitzy, Glittery Earth
Use the template (link above) or chart (above) to construct your own model of the Earth.Kids often enjoy the bright colors of glitter. Use green or blue for the crust, and gold, silver and red inside.
Natural Earth Model
Use a peach pit as the inner core, pebbles as the outer core, rice as the mantle, and a layer of dried beans for the crust.Use Word Processing Program to Make Circles
You can also make your circles with most processing programs. Insert - Shapes - Circles - Width/Height. If measurements are in inches, divide the km listed in the chart above by 2.54 (number of centimeters in an inch.)Easy: Use the Template
Cut out the template(link above) of the half earth and use markers, paints, or colored pencils to show the different layers. Label them.Make a 3-D Model of the Earth
Clay Model
Each student can build their own model of the earth. There are a variety of materials that can be used for this. Modeling clay is a simple and inexpensive media.These four colors may be helpful:
- Red - inner core
- Orange - outer core
- Yellow - mantle
- Blue - crust
Inner Core
Use the red clay to make a ball with a one centimeter radius (two centimeter diameter.) This is a little smaller than a one inch ball.
Outer Core
Now add a one centimeter blanket of orange clay around the black ball. You now will have a two layer ball that is 3 centimeters in radius and 6 centimeters in diameter.
Mantle
With the yellow clay, build a two centimeter layer around the red layer. The model is now 6 centimeters in radius and 12 in diameter.
Crust
Now we want to add a 0.5 millimeter crust to the top of our model. One millimeter is about the thickness of a dime. You will probably need to roll the clay with a rolling pin to get it this thin.
Deliciously 3 D
Here’s another 3 dimensional model of the earth’s layers which I modified from the instructions I found at Science Matters Candy Earth. (Though not as accurate in size and shape, it does taste better.)- Inner Core: Red hot cinnamon candy
- Outer Core: Yellow gummy bear, squeezed and pressed around the cinnamon candy.
- Mantle: Large marshmallow, squished and squeezed around the gummy bear.
- Crust: Magic shell ice cream topping, poured on the marshmallow and stuck in the freezer to harden.
Earth to Pizza
A Pizza d' Earth
You may use one of your 2-D models of the layers of the earth to make an earthy pizza. (Or, if you don’t want to mess up your artistic creation, you can simple copy and color the target model for this activity.)This works best with a full circle, but can also be done with the half circle.
- Fold your circle in half, then fold it again in quarters. Fold it one more time in eighths. (If you started with a half circle you will make two folds instead of three to get one-eighth piece.)
- You now have a slice of the earth. Label the slice.
- If you are doing a lap book or a poster, you can glue one of the slices to the book or poster. Make sure the labeled slice is on top. Then the rest of the “pizza” folds out.
Personal Pizza Model
Speaking of pizza, how about you make pizza models for dinner?Start with “personal sized” pizza crusts and each person can add their favorite ingredients to make a concentric pizza.
Here's one suggestion.
- Cover the pizza with sauce to the very edge (the CRUST - of both the pizza and the earth.)
- Put a pepperoni or other ingredient in the center as the INNER CORE.
- Leave the next layer (the OUTER CORE) bare, so you will see only the red pizza sauce.
- Put a circular layer of cheese where the MANTLE would be.
MatchCard Science
How To Use MatchCards
Download the FREE MatchCard Science Instructor's Guide and see how MatchCards can make building their science knowledge base fun.
Geology Unit Study
12 Science Unit Studies

Chemistry is only one of twelve complete unit studies for kids in 3rd to 8th grade.
Comprehensive objectives, hands-on projects, suggested science fair experiments, and the fun game-like MatchCards keep them interested in learning science. See all twelve MatchCard Science Unit Studies.
About Our Site
Hands-On Learning
